Preparing Weatherboard Homes for Coastal Conditions
Weatherboard and fibro homes need special care on the coast. How to prepare and paint timber and fibre cement so the finish lasts in salt air.
What's different about painting a weatherboard home on the coast?
Weatherboard and fibre-cement ("fibro") homes need more thorough preparation than rendered or brick homes, because the boards move, the joints and gaps let moisture in, and on the coast salt works into every edge and end-grain. Painting weatherboard well is mostly about preparation and sealing the vulnerable points, not just rolling on a topcoat.
Why weatherboard is more demanding
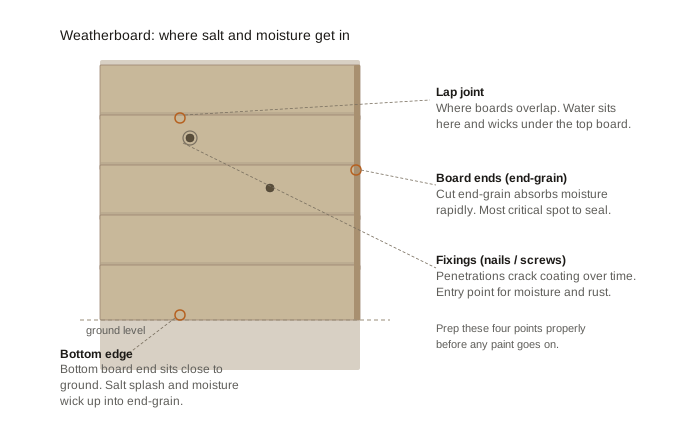
A rendered wall is one continuous surface. A weatherboard wall is dozens of separate boards with edges, overlaps, joints and fixings, and every one of those is a way in for moisture and salt. Timber also expands and contracts with heat and humidity, so the paint has to flex with it or it cracks at the joints. On the coast, add salt working into the end-grain and the gaps, and constant moisture, and you have a surface that punishes shortcuts. Fibre-cement (fibro) is more dimensionally stable than timber but has its own demands, particularly sealing cut edges and joints.
The preparation that makes or breaks it
On weatherboard, prep is where the job is won. The essentials:
Wash off salt and clean thoroughly. As with any coastal surface, salt left on the boards breaks the paint bond. Old, flaking paint and surface grime come off too.
Scrape and sand back failed paint. Loose and peeling paint must come off back to sound material, painting over it just means the new coat lifts with the old.
Treat and prime bare timber. Exposed timber needs the right primer, and end-grain and cut edges (the thirstiest, most vulnerable parts) need particular attention: they soak up moisture and are where rot and paint failure often start.
Seal the gaps. Joints, board ends and gaps around fixings get sealed with a quality flexible exterior sealant, so moisture and salt can't get behind the boards. This step is skipped constantly and it's one of the biggest reasons coastal weatherboard jobs fail.
Deal with any rot or damaged boards before painting, paint doesn't fix soft or rotten timber, it just hides it temporarily.
Painting it to last
Once prep is sound, the painting itself follows coastal principles: a quality, flexible acrylic exterior system (flexibility matters even more on timber that moves), the right primer for the substrate, and enough coats applied properly. The flexibility of a good acrylic is what lets the paint move with the boards through heat and humidity without cracking at the joints, which is exactly where rigid or cheap paint fails first. (More on choosing the system: best exterior paint for coastal homes.)
Why coastal weatherboard needs ongoing care
Weatherboard's many edges and joints mean more points that can let go over time, so it benefits from being watched and maintained more than a continuous surface does. Regular washing keeps salt out of the gaps and end-grain, and catching a failing joint or a bit of lifting paint early, before moisture gets behind the boards, prevents the rot and widespread peeling that turn a touch-up into a major repair. That's why coastal weatherboard homes do particularly well on a maintenance rhythm rather than being repainted only when they look bad.
Weatherboard rewards proper preparation and regular care. A Salt Coast site visit assesses your boards, joints and exposure, so the prep and paint suit your home and the finish is kept sound rather than left to fail at the joints.
Common questions
FAQs
How is painting weatherboard different from a brick or rendered home?
Weatherboard is dozens of separate boards with edges, joints, overlaps and fixings (every one a way in for moisture and salt), and timber moves with heat and humidity. So it needs far more preparation: cleaning, scraping, priming bare timber and end-grain, and sealing the gaps. The paint also needs to be flexible enough to move with the boards.
Do I need to seal the gaps between weatherboards?
Yes, and it's one of the most-skipped and most-important steps on the coast. Joints, board ends and gaps around fixings should be sealed with a quality flexible exterior sealant so moisture and salt can't get behind the boards. Unsealed gaps are a major reason coastal weatherboard paint jobs fail early.
Can you paint fibro (fibre cement) the same as timber weatherboard?
Similar principles, but fibro is more dimensionally stable than timber so it moves less. It still needs thorough cleaning, the right primer, and particular attention to sealing cut edges and joints. (Note: old fibro can contain asbestos, undisturbed it's painted over safely, but any cutting or sanding of pre-1990 fibro needs proper precautions or a licensed professional.)
Why does paint peel at the joints of my weatherboard house?
Usually because the joints weren't sealed and moisture got behind the boards, or because the paint wasn't flexible enough to move with the timber and cracked at the joints, letting water in. On the coast, salt working into unsealed end-grain accelerates it. Proper sealing and a flexible acrylic system prevent it.
How often should coastal weatherboard be repainted?
Generally in the same 5 to 10 year coastal range as other homes, but weatherboard's many joints and edges mean it benefits from closer monitoring and earlier touch-ups. Catching a failing joint or lifting paint early, and washing salt off regularly, prevents moisture getting behind the boards and extends the time between full repaints.